How to Install a Starlight Headliner, Complete DIY Guide
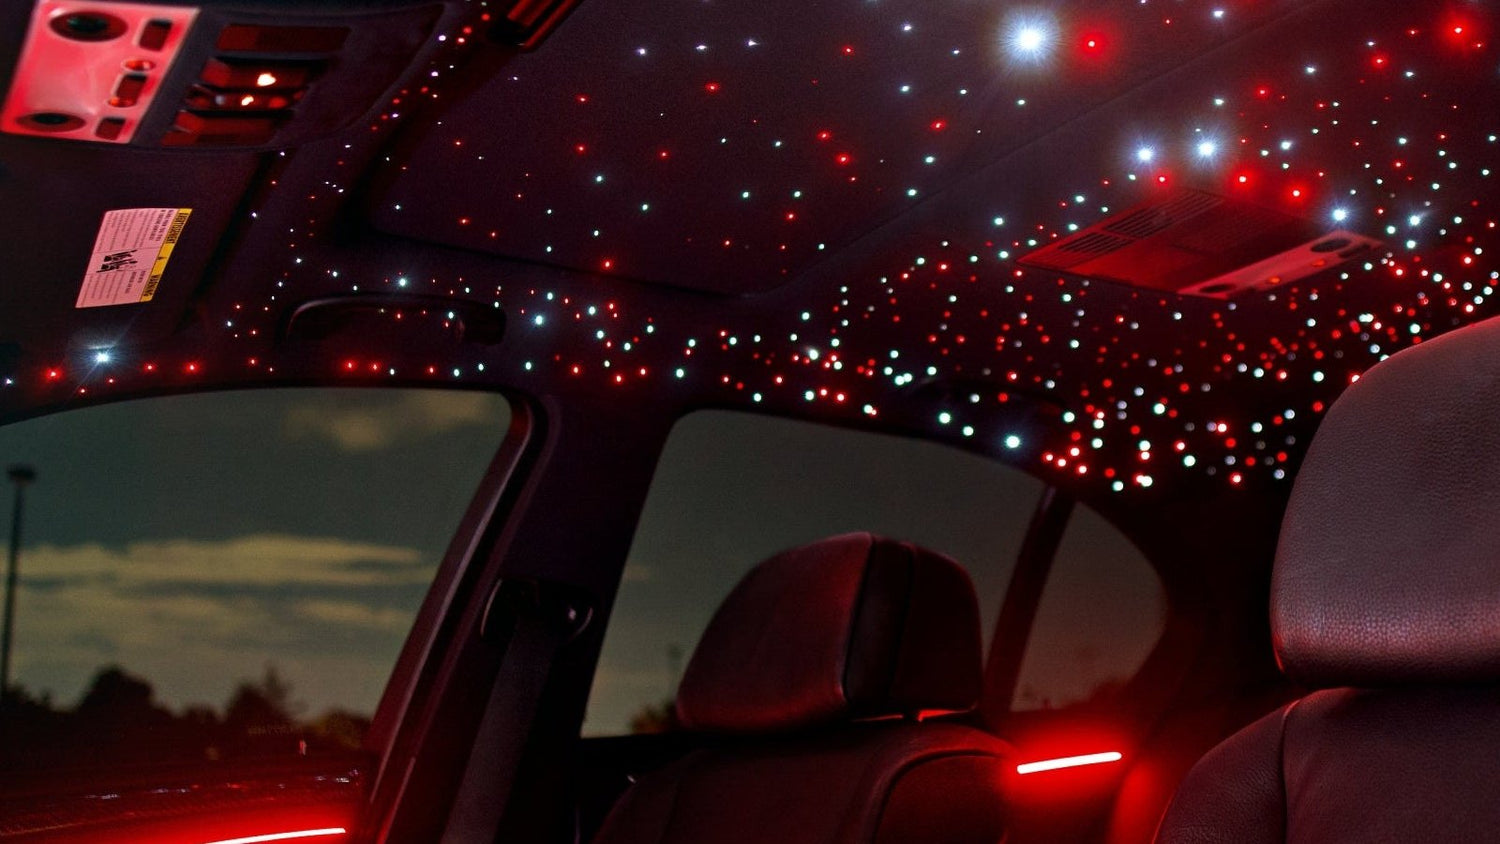
A starlight headliner is the most dramatic interior upgrade you can do to a car. Done right, the roof looks like a real night sky, 800 individual pinpoints of light with an optional shooting star effect that actually moves across the ceiling. This guide covers the full process from headliner removal to final wiring, based on a real install that took about 3 days working non-stop.
✅ Universal fit: the NIGHTGLOWE starlight kit works on any make and model.
Shop the Starlight Kit (800 or 1200 fiber strands), follow the interactive step-by-step install guide, or find the right kit for your car in 30 seconds.

Plan this for a long weekend. It's labor-intensive, but it's not complicated, just methodical.
The NIGHTGLOWE Kit, What Makes It Different
The kit that was used for this install is the NIGHTGLOWE 800-star kit. It has two key features most other kits don't:
- Two separate looms: two channels, two colors simultaneously. You can set the roof to white and purple at the same time and they'll mix together naturally, or run them as two distinct layers.
- Shooting star module: a separate 12-LED sequential system with 60 thicker fiber strands. The shooting star actually moves across the ceiling in a sequence you can control for speed and direction.
The kit includes: two fiber optic looms (400 strands each = 800 total), shooting star module, remote, connectors, and AC/DC adapter.

Step 1: Remove the Headliner
Everything attached to the headliner comes off first: sun visors (typically two T20 screws + one electrical connector each), grab handles (flip down the cover, two screws), sunroof controls (pry off with trim tool, disconnect connectors), and dome lights (push the metal prongs inward, there are two per light).
On the A and C pillars, pop off the airbag cap with a pick, there's a screw hidden underneath. Remove all pillar trims.
If your car has a sunroof: you'll need to remove the sunroof glass to access the headliner screws. Pop off the dust covers (two clips each side), remove the three screws per side, lift the glass out, then remove the four screws for the inner cover. This exposes the 12 T10 screws holding the headliner. Once those are out, there's one final Phillips head screw, remove it and the headliner comes down. Put the driver seat all the way back and reclined to slide it out through the door gap.
Step 2: Plan Your Star Layout
With 800 strands and the headliner flat on a padded surface, divide it into 8 equal sections. With 100 stars per section the density is good, not too sparse, not so dense it looks fake. Mark each section boundary lightly with a marker.
Mark 100 dots per section, spread naturally, not in a grid. Vary the spacing like a real night sky. Don't skip the plastic trim pieces and foam sections: drill holes there too, or you'll have obvious dead zones when everything is lit. Around the sun visor cutouts you can leave it empty since the visors cover it anyway.
Step 3: Drill 800 Holes
Use a very small drill bit in a Dremel. The headliner is foam, it goes through easily, pop pop pop. You'll develop a rhythm. This takes a while but it's mindless once you're going.
For the shooting star fibers: they're thicker than the regular strands and need a larger drill bit. Mark those positions separately with an X before you start drilling regular holes.
Step 4: Separate the Strands
Split each 400-strand loom into 8 bunches of roughly 50 strands each. It doesn't need to be exactly 50, close enough. Bundle each bunch with tape and label it with the section number. This stops the whole thing from becoming an unmanageable tangle.
For the shooting star: the module has 12 lights and you have 60 strands, so each light gets 5 strands. Bundle them in groups of 5, label them 1–12 in sequence so you know which bundle plugs into which position on the module.
Step 5: Thread the Regular Strands
Take one 50-strand bunch to its section. Thread one strand per hole, find the hole, pull the strand through from the top, let it hang out the back. Keep going. When a bunch is done, run the tails together and tape them off.
To secure each strand: pull it tight so it sits flush on the fabric surface, then put a small dab of black hot glue on the back side of the foam over the strand. Hold for 10–15 seconds until cool. Black hot glue from Temu was about $10 for 50 sticks, works perfectly and doesn't show through the fabric.
Critical: keep everything flat. When the headliner goes back in, it has to sit flush against the roof. Strands that are fluffy or bunched will make the headliner sit away from the roof and you'll have to pull it all out again.
Step 6: Install the Shooting Star Strands
Thread each 5-strand bundle through the larger holes. Crimp the bundle end into the connector that plugs into the shooting star module, and add a drop of hot glue inside the crimp to lock the strands. Once dry, clip the excess fiber flush.
Running two shooting star paths off one module: split bundles so 2 strands go to one path and 3 go to the other. They'll look slightly different in brightness which actually looks better than identical paths.
Step 7: Organize Before Reinstall
Tape all loom tails together by section and route them toward where the light motor will live. This is where it gets overwhelming, there are hundreds of strands going in every direction. Tape is your best friend. Color-code the two looms (set them to green and purple to tell them apart visually) and route them separately so they'll be evenly mixed in each section of the final headliner.
Step 8: Sunroof Cover (if applicable)
Drill holes through the sunroof cover (it's metal, harder, slower). Assign a small dedicated loom to this cover. When routing it, remember the cover slides back and forth, the loom must be secured at the cover with hot glue so it moves with the cover and doesn't get pinched or kinked as the sunroof opens. Test the full range of motion before reinstalling the glass.
Step 9: Where to Mount the Light Motor
Don't mount the module above the headliner in the roof cavity. The foam acts as insulation and the module generates real heat, it'll shorten its lifespan. Mount it in the trunk instead. It's easy to access, there's airflow, and if anything ever needs to be replaced you're not tearing out the headliner.
Run the fiber bundles back from the headliner into the trunk through the roof structure channels. Secure them to existing wiring harnesses with zip ties.
Step 10: Reinstall the Headliner
Guide the headliner back in carefully, routing all fiber bundles through the roof structure as you go. Reconnect the dome lights, refit the sunroof controls, grab handles, and sun visors. Press all pillar trims back into their clips, you should hear each one click.
Step 11: Wire the Modules
The simplest power source: a fuse tap into the cigarette lighter fuse. This gives you ignition-switched 12V, on when the car is on, off when locked. Use an add-a-circuit fuse tap so you don't have to cut any factory wiring. Run the power wire from the fuse box back to the trunk where both modules sit. Ground to any bare metal bolt in the trunk.

App Control
The NIGHTGLOWE app controls both channels independently or together. Set L1 and L2 to different colors for the two-tone effect, or lock them to the same color. Modes include:
- Static color (any color on the spectrum)
- RGB fade (cycles through colors on both channels)
- Sound reactive (syncs to music/ambient sound)
- Twinkle: speeds 1 through 4 (slow subtle shimmer to rapid sparkling)
- Shooting star: adjustable speed and direction
Time Estimate
Budget 3 full days if you're doing this for the first time. The actual drilling and strand threading are the time sinks, 800 holes and 800 strands to glue takes about 12 hours of focused work just for the headliner prep. Removal and reinstall are each 2–3 hours depending on the car. It's not hard, it's just long.

Get the NIGHTGLOWE starlight kit, 800 or 1,200 strands, dual-colour 20W engine with shooting star module: Shop Starlight Kits
Installing on a specific car? See the model guides for BMW, Mercedes, Tesla and 30+ other models, or use the kit finder.
Doing Both Starlight + Ambient Lighting? Get the Bundle
The NIGHTGLOWE GalaxyDrive Bundle™ combines the dual-colour 20W starlight kit (with shooting stars) and the interior ambient lighting kit into one package, cheaper than buying them separately. Available in 800 or 1200 fiber strand configurations, paired with the 14-in-1, 18-in-1, or 22-in-1 ambient kit.
Leave a comment
This site is protected by hCaptcha and the hCaptcha Privacy Policy and Terms of Service apply.