How to Install Car Ambient Lighting, Complete DIY Guide
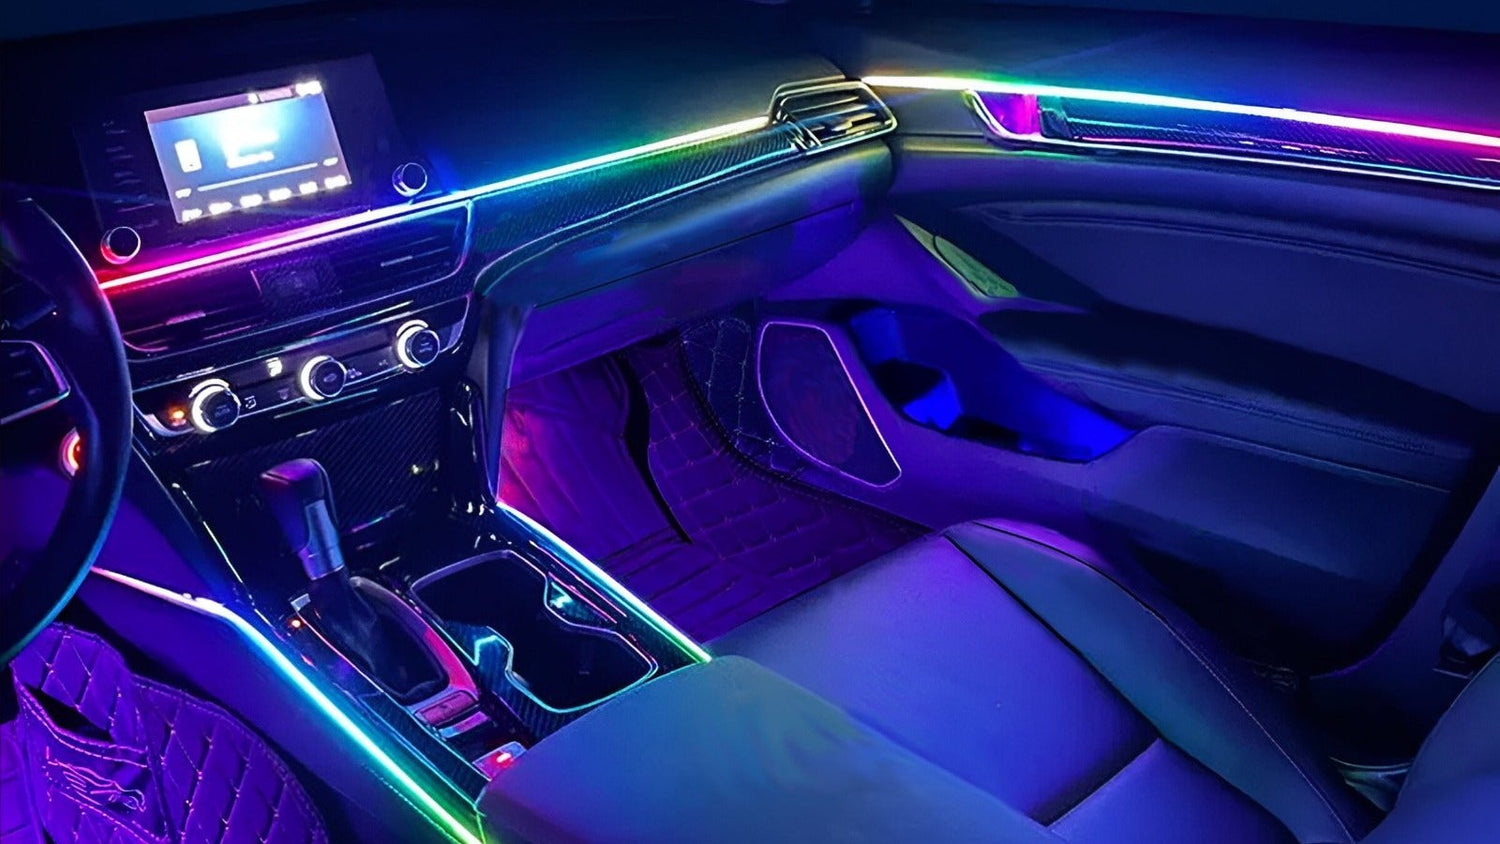
This is a step-by-step guide based on a real installation, doors, dash, footwells, door handles, and storage bin lighting all done in one session. When it's finished, the strips are essentially invisible in daylight and the light output is smooth and even with no hotspots.
✅ Universal fit: the NIGHTGLOWE ambient kit works on any make and model.
Shop the Ambient Lighting Kit (14, 18, or 22-in-1), follow the interactive step-by-step install guide, or find the right kit for your car in 30 seconds.

What Makes This Kit Different
The key to a clean ambient lighting install is strip thickness. The NIGHTGLOWE strips are less than 1mm thin: thin enough to slide into the existing gap between your door card and the trim panel without any modification. When the lights are off, there's just a faint white line that's nearly invisible. Most kits on Amazon use standard-width strips that require cutting channels or visible mounting.

The kit also uses a wireless subcontroller system: one main controller connects to up to four subcontrollers, one per door, all wirelessly. You only need to run power and ground to each subcontroller, not a signal wire back to the main unit. Significantly less wiring.
What's in the Kit
- 6 LED strips: 4 door strips, 1 long dash strip, 1 short dash strip (left side)
- Optional footwell lights (highly recommended)
- 1 main controller
- 4 wireless subcontrollers (one per door)
- Storage bin lights and door handle lights
- Extension cable for left dash strip
- Double-sided tape throughout
Step 1: Main Controller Placement and Power
The main controller needs to sit in the center of the car where all wire runs can reach it. The center console area near the cigarette lighter is ideal, it's central, it has 12V ignition-switched power, and you only need to pop off one or two trim pieces to access the wiring.
Tap into the cigarette lighter wiring: the red wire gives you power whenever the ignition is on (day and night). If you only want the lights when the headlights are on, tap the white wire instead. Solder the joints if you can, if not, use pin-pierce tap connectors: thread both wires through, push the metal clip down, it pierces the insulation and connects them electrically.
Once connected, test before running any strips. Plug the controller in and confirm it powers up.
Step 2: Dash Strips
The dash strip runs across the full dashboard. It sits in the natural gap between the instrument cluster brow and the dash face, just push it in. The strip can be cut to length anywhere along its run, unlike traditional LED strips that have specific cut points.
The left-side short strip uses the included extension cable. Snap the extension to the short strip and route it back to the main controller. Set the controller in position, behind the center console panel is clean and hides all the wiring.
Step 3: Footwell Lights
The footwell strips connect to the main controller via the built-in outputs. The challenge is routing them under the dash to the foot wells. Use a long thin grabber tool (a claw retriever works great) to fish the wire through, hook it on and pull it through. Stick the footwell strips to the panel beside the OEM footwell lights with the included double-sided tape. Do both driver and passenger at the same time while you have access.
Step 4: Door Panel Removal
Each door is the same process. There are two screws hidden behind covers, pop the covers off, remove the Phillips or bolt head screws. Then use a plastic trim tool along the bottom edge of the door panel to pop the clips. Work your way around, there are typically 6–8 clips. Once all clips are released, lift the panel up to free it from the door frame.
With the panel off, look at the existing wiring harness behind the door. Many cars come from the factory with a small ambient lighting LED (even if it's barely visible). This LED has 12V on it, test it with a multimeter. If it reads 12V, this is your power source for the subcontroller. No need to run new wiring from the front of the car.
If your car doesn't have factory ambient lighting, test the window switch connector, the switch backlight wire usually has 12V when the ignition is on. Use that instead.
Step 5: Wire the Door Subcontroller
Each subcontroller only needs power (+12V) and ground. Connect it to your identified 12V source and any convenient ground point (a bolt into metal). Power it up, it should connect wirelessly to the main controller automatically and sync color/effects. No additional wiring between doors and main controller needed.
Step 6: Run the LED Strip Into the Door
The strip needs to get from the subcontroller (mounted inside the door) to the visible channel on the door card. You need a small hole through the door card for the wires. Start small, drill a pilot hole just wide enough for the wires, not the connector.
Here's the key technique: depin the connector before threading through. Use a pick or thin screwdriver to push down the small metal tab on each pin inside the connector housing, the wire slides right out. Thread the individual wires through the small hole, then re-pin the connector on the other side. This way your hole stays nearly invisible (the size of 3 wires) instead of connector-sized (which would be 6–7x bigger).
With the wires through, gently pry the door card gap open slightly and slide the ultra-thin strip in. It takes a bit of force on some cars, work it in slowly. Once it's seated, push the heat-shrunk end section inward using a card so it's not visible from the front.
Step 7: Door Handle and Storage Bin Lights
Many cars have a factory ambient light channel in the door handle, a plastic diffuser that clips into the handle and glows. Remove the factory LED and replace it with the included NIGHTGLOWE LED, positioned so the light goes through the same factory diffuser channel. No drilling, no additional holes, clips right back in.
For the storage bin light: drill a small hole at the back of the storage bin channel (so the light doesn't shine directly in your eyes while driving). Push the LED module housing through from the front, it clips in place. Attach the wiring to the subcontroller, mount the subcontroller with double-sided tape in a dry hidden spot inside the door, and reassemble.
Step 8: Reassemble and Test
Before putting the door panel back on, test all lights in the door, strip, door handle, storage bin. Once confirmed, clip the door panel back onto the door frame (line up the clips and press firmly until each one clicks), reinstall the screws, and replace the screw covers.
Repeat for all four doors.
The Result
When it's done, every light runs off one controller, change the color on the app and everything shifts simultaneously. The strips are invisible in daylight. At night the light is smooth and even with no visible LED dots, no hotspots, just a continuous glow that follows the shape of your interior. Door handles glow, storage bins glow, footwells glow, the full dash strip ties it all together.


Get the NIGHTGLOWE ambient lighting kit, ultra-thin strips, wireless subcontrollers, everything included: Shop Ambient Kits (14, 18, or 22-in-1)
Want model-specific tips? Browse the full install guide or the vehicle guides for Tesla, BMW, F-150 and 30+ other models.
Doing Both Starlight + Ambient Lighting? Get the Bundle
The NIGHTGLOWE GalaxyDrive Bundle™ combines the dual-colour 20W starlight kit (with shooting stars) and the interior ambient lighting kit into one package, cheaper than buying them separately. Available in 800 or 1200 fiber strand configurations, paired with the 14-in-1, 18-in-1, or 22-in-1 ambient kit.


Leave a comment
This site is protected by hCaptcha and the hCaptcha Privacy Policy and Terms of Service apply.